Arena 2.0:My media
From ArenaWiki
(Difference between revisions)
m (→Make a reservation) |
m |
||
| Line 1: | Line 1: | ||
| − | |||
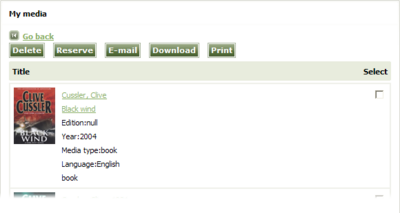
[[Image:my_media.png|400px|thumb|right|My Media]] | [[Image:my_media.png|400px|thumb|right|My Media]] | ||
My Media is a convenient basket to store items that interest you as you browse the library. You view and work with items in the basket at any time. For example, you may use the basket to collect items that you are considering borrowing. You may then review the items in the basket and select one or more of them to reserve. | My Media is a convenient basket to store items that interest you as you browse the library. You view and work with items in the basket at any time. For example, you may use the basket to collect items that you are considering borrowing. You may then review the items in the basket and select one or more of them to reserve. | ||
| Line 7: | Line 6: | ||
See also [[my collection|My Collection]]. | See also [[my collection|My Collection]]. | ||
| − | == | + | ==How to add an item to My Media== |
#Find an item that interests you. To learn more see [[search|Search]]. | #Find an item that interests you. To learn more see [[search|Search]]. | ||
#Click '''Add to My Media basket'''. | #Click '''Add to My Media basket'''. | ||
| − | == | + | ==How to view My Media== |
#Locate the toolbar near the top of the screen. | #Locate the toolbar near the top of the screen. | ||
#Click '''My Media'''. | #Click '''My Media'''. | ||
| − | == | + | ==How to work with items you have added to My Media== |
#View the My media basket. To learn more see above. | #View the My media basket. To learn more see above. | ||
Revision as of 11:29, 11 February 2011
My Media is a convenient basket to store items that interest you as you browse the library. You view and work with items in the basket at any time. For example, you may use the basket to collect items that you are considering borrowing. You may then review the items in the basket and select one or more of them to reserve.
Whatever you add to My Media's basket remains after you log off from Arena, so you can return to it the next time you log in. Your My Media basket is accessible only to you. No other Arena users can see it.
See also My Collection.
Contents |
How to add an item to My Media
- Find an item that interests you. To learn more see Search.
- Click Add to My Media basket.
How to view My Media
- Locate the toolbar near the top of the screen.
- Click My Media.
How to work with items you have added to My Media
- View the My media basket. To learn more see above.
Above the list of reservations is a toolbar at which you may do one of the following:
- Click Send to email the list to a recipient. You must have at least one reservation selected.
- Click Print to print the list. You must have at least one reservation selected.
- Click Download to download the list. You must have at least one reservation selected.
- Click Select all to select all items on the page.
- Click Unselect all to unselect all items.
- Click Delete to delete the selected items.
- Click Reserve to delete the selected items.
How to make a reservation
- Some reservations may incur a fee.
- If you have not logged in to Arena, do so now. To learn more see Login and Logout.
- Locate the Navigation panel.
- Click My Pages. The various features in My Pages will open in the Navigation panel.
- Click My Media. The My Media panel will open.
- Click the item title to view its details.
- Check the Available field to see that at least one copy is available.
- Click Reserve. Details of the reservation will appear below the item details.
- If the item you want to reserve is located in Finland, click Normal reservation to make a normal reservation, or click Regional reservation to make a regional reservation.
- In Pickup branch select the library branch from which you would like to collect the item.
- In Valid from type the date on which you want the reservation to start. It will default to the current date.
- In Valid to type the date on which you want the reservation to end. The default date will depend on the limits allowed by the library accepting the reservation.
- Click Save to save the reservation, or click Cancel to cancel the reservation. When saved, the reservation is added to My Reservations.
You may also reserve items that you have found in a search. To learn more see Reservations.
