Arena 2.0:Admin page management
This article explains how to manage and configure pages.
Arena's features are grouped into task-related pages (also known as tabs). You may configure almost any aspect of a page. For example, you may add or remove pages, change a page's name, the way it looks, its dependency on other Arena features and settings, and its relationship to other pages.
This article explains only aspects of Liferay administration relevant to this subject. To learn more about Liferay administration see the Liferay Portal Administrator's Guide ![]() .
.
The look and feel of individual portlets is discussed in a separate article To learn how to configure portlets see Portlets.
Contents |
How to reach the page management settings
- If you have not already signed in to Arena Administration mode, do so now.
- Click the Welcome menu, and the click Manage Pages. The Manage Pages menu will appear.
Each page is managed in various ways, using settings grouped into three tabs: Pages, Look and Feel, and Export/Import. As page management tasks use most of the settings in all three tabs, the following instructions describe the tasks not in terms of these tags, but in terms of the results they produce.
How to create a page
- If you have not already signed in to Arena Administration mode, do so now.
- Click the Welcome menu, and the click Manage Pages. The Manage Pages menu will appear.
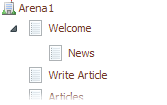
- In the tree view, click the page that will be the parent page for the new page. The Children sub-tab will become the current tab in the right-hand area.
- The Children sub-tab includes two further sub-tabs, New Page and Display Order. Click the In the New Page sub-tab, if necessary.
- In Name type the name of the new page.
- In Type choose the page type. For example, if you want the page to appear as a panel, choose Panel.
- Tick Hidden if the page will be hidden from Arena users. This is useful if the page is not yet ready for use.
- Tick Copy Parent if the page will be a copy of the parent page. This is useful if you intend to create a new page, based on an existing one.
- Click Add Page to save the changes. The new page will appear in the tree view, at left. If the page is a parent page, it will also appear in the Arena toolbar.
How to configure a page
- If you are configuring a top-level page 'Arena1' then only the 'Children sub-tab is available.
- If you have not already signed in to Arena Administration mode, do so now.
- Click the Welcome menu, and the click Manage Pages. The Manage Pages menu will appear.
- In the tree view, click the page that you want to configure.
- Click the Page sub-tab, if necessary.
- In Default Language, choose the language for the page. This is required only if the language will not be English.
- In Name, type the name of the page. This name will appear in the toolbar.
- In HTML title type the page title as it will appear in the title bar of the web browser.
- In Type choose the page type. For example, if you want the page to appear as a panel, choose Panel.
- Tick Hidden if the page will be hidden from Arena users. This is useful if the page is not yet ready for use.
- In Friendly URL type the friendly URL for the page. You should only change this if the current URL (which is based on the page name), produces an awkward URL.
- In Query String type the default parameter for the page.
- In Icon choose an icon that will appear beside the page name. Click Browse, and then follow the on-screen prompts to choose the icon.
- Tick Use Icon to use the icon. This enables you to hide the icon, if necessary.
- In Copy Page choose a page from which to copy content. This is useful if you intend to create a new page, based on an existing one.
- To learn how to use theMeta Tags and JavaScript settings, contact Axiell Help Desk.
- Click Save to save the changes.
How to set the look and feel for a page
You may set the look and feel for a single page or for all pages. You may also edit a theme or CSS, to create a new look and feel for a page. To learn more see Styling or contact the Axiell Helpdesk.
This page enables you to configure the look of the page. For example, you may choose a theme or CSS for the page.
- If you have not already signed in to Arena Administration mode, do so now.
- Click the Welcome menu, and the click Manage Pages. The Manage Pages menu will appear.
- Choose the type of web browser for which you want to configure the page. You may configure for traditional web browsers (such as Internet Explorer, Firefox and Safari), or for mobile web browsers (such as Opera Mini) on mobile devices (such as Blackberry, Palm, and iPhone).
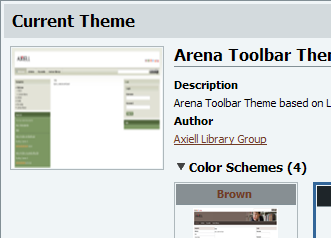
- Click a theme. When a theme is selected, it is applied immediately.
How to set the look and feel for all pages
If you are setting the overall look and feel for Arena, it is useful to apply the same theme to all pages. Later, you may apply other themes to individual pages. This page enables you to configure the look of the page. For example, you may choose a theme or CSS for the page.
- If you have not already signed in to Arena Administration mode, do so now.
- Click the Welcome menu, and the click Manage Pages. The Manage Pages menu will appear.
- Choose the type of web browser for which you want to configure the page. You may configure for traditional web browsers (such as Internet Explorer, Firefox and Safari), or for mobile web browsers (such as Opera Mini) on mobile devices (such as Blackberry, Palm, and iPhone).
- Click a theme. When a theme is selected, it is applied immediately.
How to set the page display order
You may change the order in which pages appear in the tree view.
- If you have not already signed in to Arena Administration mode, do so now.
- Click the Welcome menu, and the click Manage Pages. The Manage Pages menu will appear.
- In the tree view, click the page that you want to configure.
- Click the Children sub-tab, if necessary.
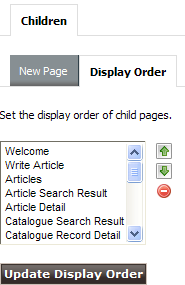
- The Children sub-tab includes two further sub-tabs, New Page and Display Order. Click the Display Order sub-tab.
- In the page list, click the page that you want to reposition.
- Click
 or
or  to reposition the page above or below other pages.
- Click
 to delete the page from the tree view, if it is not required there.
- Click Update Display Order to save the changes.
How to set page permissions
You may set permissions for the page. This enables you to choose how users may interact with the page.
- If you have not already signed in to Arena Administration mode, do so now.
- Click the Welcome menu, and the click Manage Pages. The Manage Pages menu will appear.
- In the tree view, click the page that you want to configure.
- Click the Page sub-tab, if necessary.
- Scroll down to the end of the settings page.
- Click Permissions. The Permissions screen will open.
- Each row in the table refers to a user type; each column refers to each form of interaction. for each user type, tick the forms of interaction that will be allowed.
- Click Submit to save the changes.
How to export parts of Arena
You may export parts of Arena. For example, you may export the user preferences part of Arena,.
- Export and import are Liferay features. As Arena operates within Liferay, you may not use the import feature here. This is because you would be importing into the system that you are currently using, which could cause major conflicts between features and settings currently in use, and those being imported and replacing them. You may only import into Arena from outside Arena. To learn more the Liferay Portal Administrator's Guide
 .
.
- If you have not already signed in to Arena Administration mode, do so now.
- Click the Welcome menu, and the click Manage Pages. The Manage Pages menu will appear.
- Click the Export' tab, if necessary.
- In Export the selected data to the given LAR file name choose a file name for the file which will contain the exported data.
- In What would you like to export? tick the items to export. In the Range section, if you choose Last then you must choose the range of hours for which data will be exported.
- Click More Options if you would like to include additional items in the export, and then tick the items to export.
- Click Export to export the data.


